> ## Documentation Index
> Fetch the complete documentation index at: https://docs.keephq.dev/llms.txt
> Use this file to discover all available pages before exploring further.
# Manual Correlation Rules
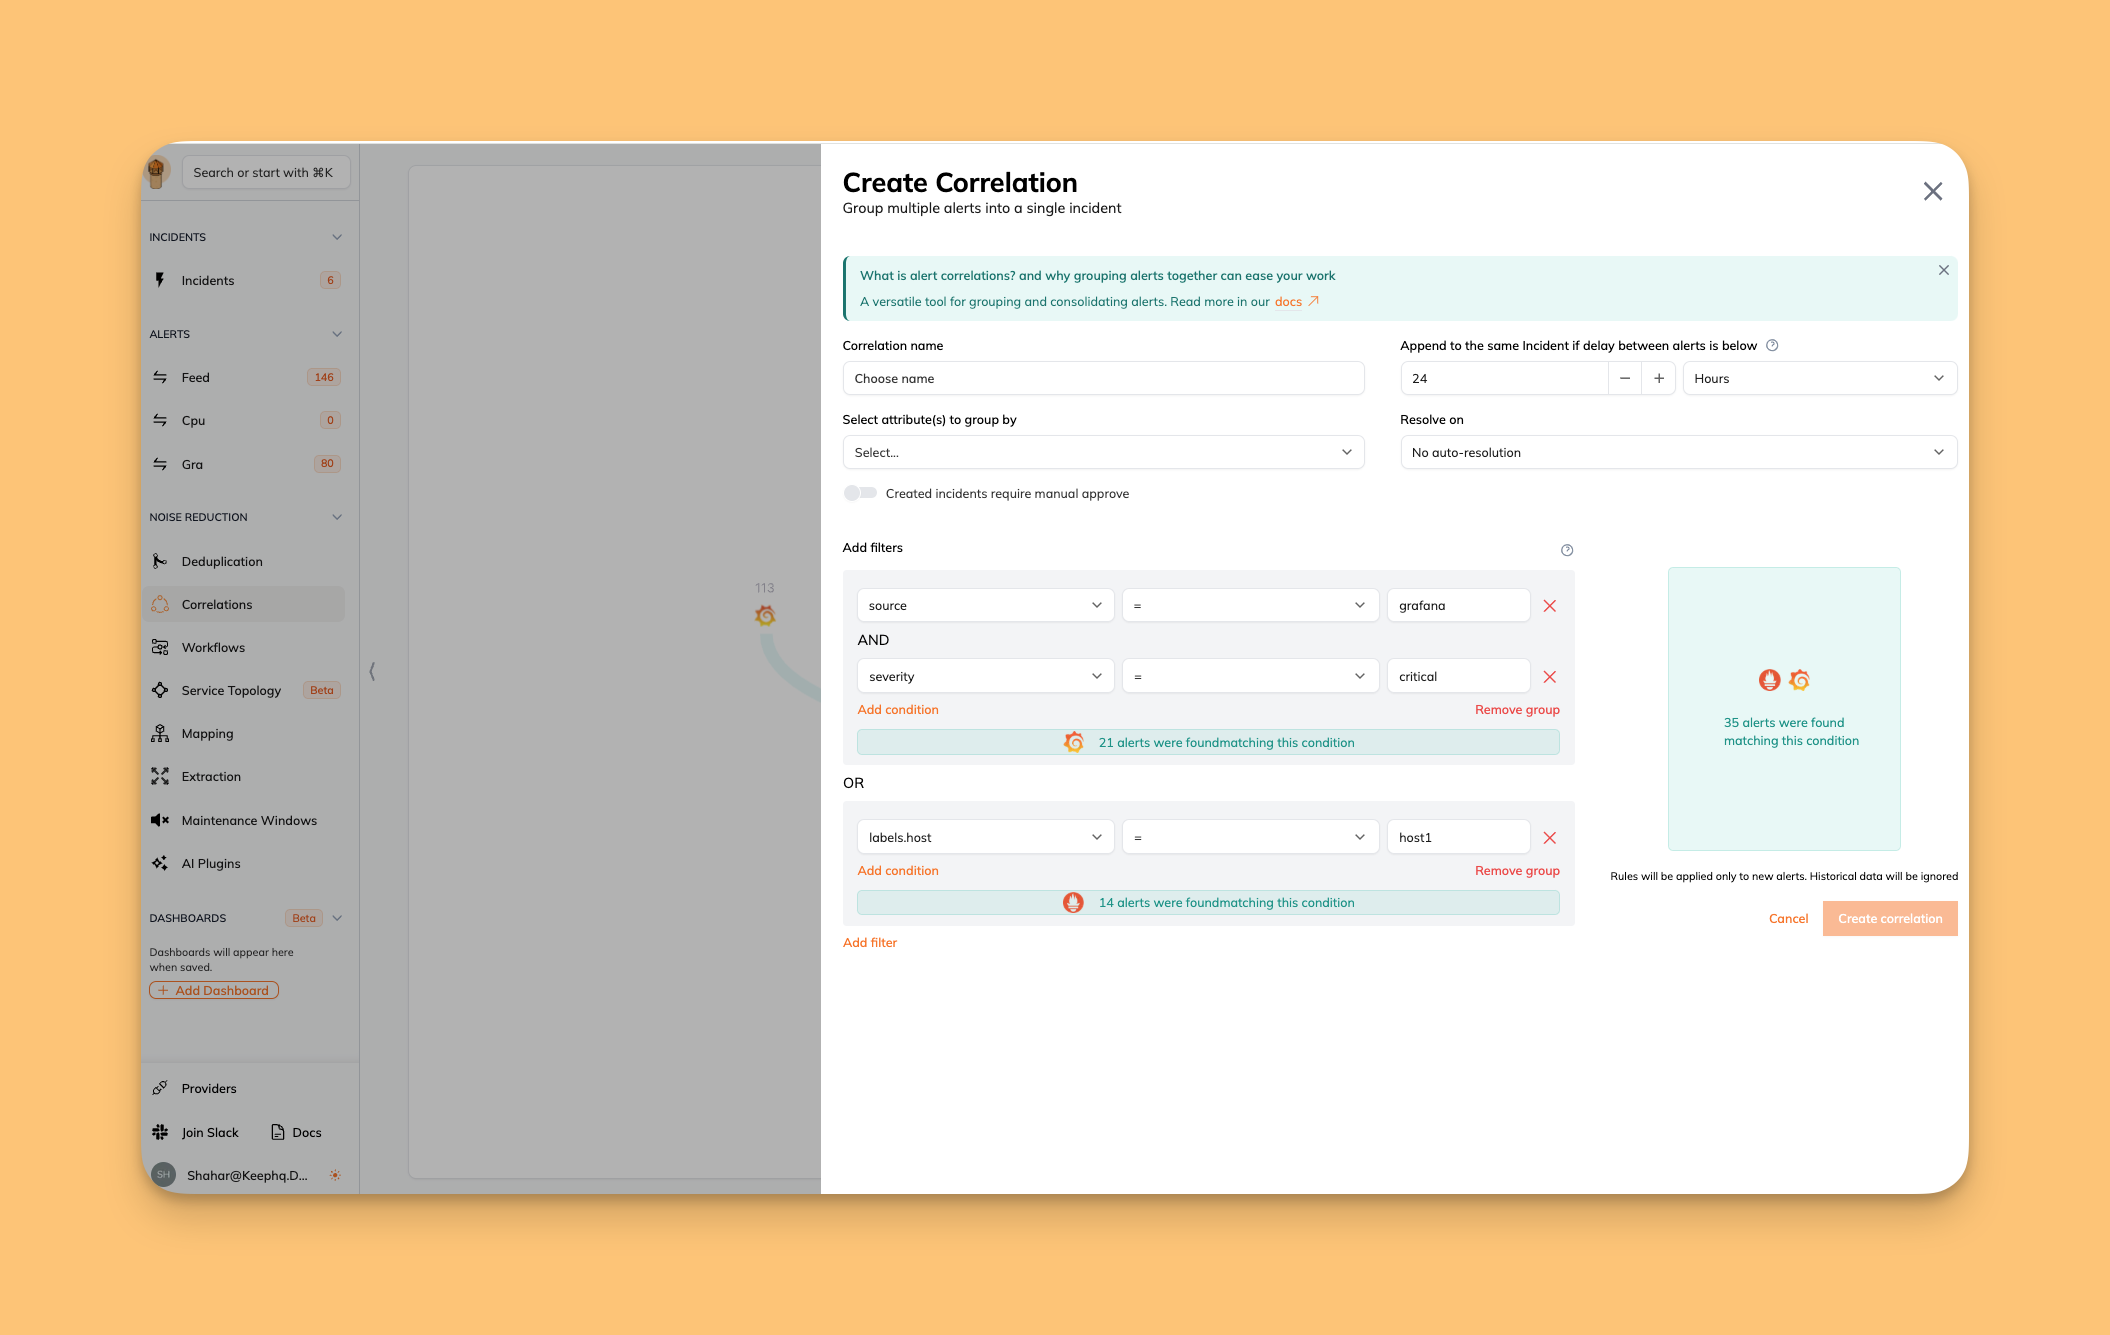
The Keep Correlation Engine is a versatile tool for correlating and consolidating alerts into incidents or incident-candidates.
This guide explains the core concepts, usage, and best practices for effectively utilizing the rule engine.
 ## Core Concepts
* **Rule definition**: A rule in Keep is a set of conditions that, when met, creates an incident or incident-candidate.
* **Alert attributes**: These are characteristics or data points of an alert, such as source, severity, or any attribute an alert might have.
* **Conditions and logic**: Rules are built by defining conditions based on alert attributes, using logical operators (like AND/OR) to combine multiple conditions.
## Creating Correlation Rules
Creating a rule involves defining the conditions under which an alert should be categorized or actions should be grouped.
1. **Accessing the Correlation Engine**: Navigate to the Correlation section in the Keep platform.
2. **Defining rule criteria**:
* **Name the rule**: Assign a descriptive name that reflects its purpose.
* **Set conditions**: Use alert attributes to create conditions. For example, a rule might specify that an alert with a severity of 'critical' and a source of 'Prometheus' should be categorized as 'High Priority'.
* **Logical grouping**: Combine conditions using logical operators to form comprehensive rules.
* **Manual approve**: Create Incident-candidate or full-fledged incident.
## Dynamic Incident Naming
The correlation engine supports dynamic incident naming based on alert attributes. This allows you to create more meaningful and context-aware incident names that reflect the actual alert data.
### Template Variables
You can use template variables in your incident name using the `{{ alert.attribute }}` syntax. These variables are replaced with actual values from the alerts. For example:
* `{{alert.labels.host}}` - References the host from alert labels
* `{{alert.service}}` - References the service name from the alert
### Behavior with Multiple Alerts
When an incident contains multiple alerts:
* Values from all alerts are automatically concatenated with commas
* Duplicate values are automatically deduplicated
* If a new alert adds a unique value, the incident name is updated to include it
#### Dynamic Name Example
**Template:** "Service Issue on `{{alert.labels.host}}`"
**First alert**
```
{
...
{
"labels": {
"host": "host1"
}
}
...
}
```
**Second alert**
```
{
...
{
"labels": {
"host": "host2"
}
}
...
}
```
**Incident Name**
Service Issue on host1,host2
## Examples
* **Metric-based alerts**: Construct a rule to pinpoint alerts associated with specific metrics, such as high CPU usage on servers. This can be achieved by grouping alerts that share a common attribute, like a 'CPU usage' tag, ensuring you quickly identify and address performance issues.
* **Feature-related alerts**: Establish rules to create incident by specific features or services. For instance, you can start incident based on a 'service' or 'URL' tag. This approach is particularly useful for tracking and managing alerts related to distinct functionalities or components within your application.
* **Team-based alert management**: Implement rules to create incidents according to team responsibilities. This might involve grouping based on the systems or services a particular team oversees. Such a strategy ensures that alerts are promptly directed to the appropriate team, enhancing response times and efficiency.
## Core Concepts
* **Rule definition**: A rule in Keep is a set of conditions that, when met, creates an incident or incident-candidate.
* **Alert attributes**: These are characteristics or data points of an alert, such as source, severity, or any attribute an alert might have.
* **Conditions and logic**: Rules are built by defining conditions based on alert attributes, using logical operators (like AND/OR) to combine multiple conditions.
## Creating Correlation Rules
Creating a rule involves defining the conditions under which an alert should be categorized or actions should be grouped.
1. **Accessing the Correlation Engine**: Navigate to the Correlation section in the Keep platform.
2. **Defining rule criteria**:
* **Name the rule**: Assign a descriptive name that reflects its purpose.
* **Set conditions**: Use alert attributes to create conditions. For example, a rule might specify that an alert with a severity of 'critical' and a source of 'Prometheus' should be categorized as 'High Priority'.
* **Logical grouping**: Combine conditions using logical operators to form comprehensive rules.
* **Manual approve**: Create Incident-candidate or full-fledged incident.
## Dynamic Incident Naming
The correlation engine supports dynamic incident naming based on alert attributes. This allows you to create more meaningful and context-aware incident names that reflect the actual alert data.
### Template Variables
You can use template variables in your incident name using the `{{ alert.attribute }}` syntax. These variables are replaced with actual values from the alerts. For example:
* `{{alert.labels.host}}` - References the host from alert labels
* `{{alert.service}}` - References the service name from the alert
### Behavior with Multiple Alerts
When an incident contains multiple alerts:
* Values from all alerts are automatically concatenated with commas
* Duplicate values are automatically deduplicated
* If a new alert adds a unique value, the incident name is updated to include it
#### Dynamic Name Example
**Template:** "Service Issue on `{{alert.labels.host}}`"
**First alert**
```
{
...
{
"labels": {
"host": "host1"
}
}
...
}
```
**Second alert**
```
{
...
{
"labels": {
"host": "host2"
}
}
...
}
```
**Incident Name**
Service Issue on host1,host2
## Examples
* **Metric-based alerts**: Construct a rule to pinpoint alerts associated with specific metrics, such as high CPU usage on servers. This can be achieved by grouping alerts that share a common attribute, like a 'CPU usage' tag, ensuring you quickly identify and address performance issues.
* **Feature-related alerts**: Establish rules to create incident by specific features or services. For instance, you can start incident based on a 'service' or 'URL' tag. This approach is particularly useful for tracking and managing alerts related to distinct functionalities or components within your application.
* **Team-based alert management**: Implement rules to create incidents according to team responsibilities. This might involve grouping based on the systems or services a particular team oversees. Such a strategy ensures that alerts are promptly directed to the appropriate team, enhancing response times and efficiency.