> ## Documentation Index
> Fetch the complete documentation index at: https://docs.keephq.dev/llms.txt
> Use this file to discover all available pages before exploring further.
# AppDynamics
> AppDynamics provider allows you to get AppDynamics `alerts/actions` via webhook installation
## Authentication
This provider requires authentication.
* **appDynamicsAccountName**: AppDynamics Account Name (required: True, sensitive: False)
* **appId**: AppDynamics appId (required: True, sensitive: False)
* **host**: AppDynamics host (required: True, sensitive: False)
* **appDynamicsAccessToken**: AppDynamics Access Token (required: False, sensitive: False)
* **appDynamicsUsername**: Username (required: False, sensitive: False)
* **appDynamicsPassword**: Password (required: False, sensitive: True)
Certain scopes may be required to perform specific actions or queries via the provider. Below is a summary of relevant scopes and their use cases:
* **authenticated**: User is Authorized (mandatory)
* **administrator**: Administrator privileges (mandatory)
## In workflows
This provider can't be used as a "step" or "action" in workflows. If you want to use it, please let us know by creating an issue in the [GitHub repository](https://github.com/keephq/keep/issues).
## Connecting with the Provider
1. Ensure you have a AppDynamics account with the necessary [permissions](https://docs.appdynamics.com/accounts/en/cisco-appdynamics-on-premises-user-management/roles-and-permissions). The basic permissions required are `Account Owner` or `Administrator`. Alternatively you can create an account [instructions](https://docs.appdynamics.com/accounts/en/global-account-administration/access-management/manage-user-accounts)
## Provider configuration
1. Find your account name [here](https://accounts.appdynamics.com/overview).
2. Get the appId of the Appdynamics instance in which you wish to install the webhook into.
3. Determine the Host [here](https://accounts.appdynamics.com/overview).
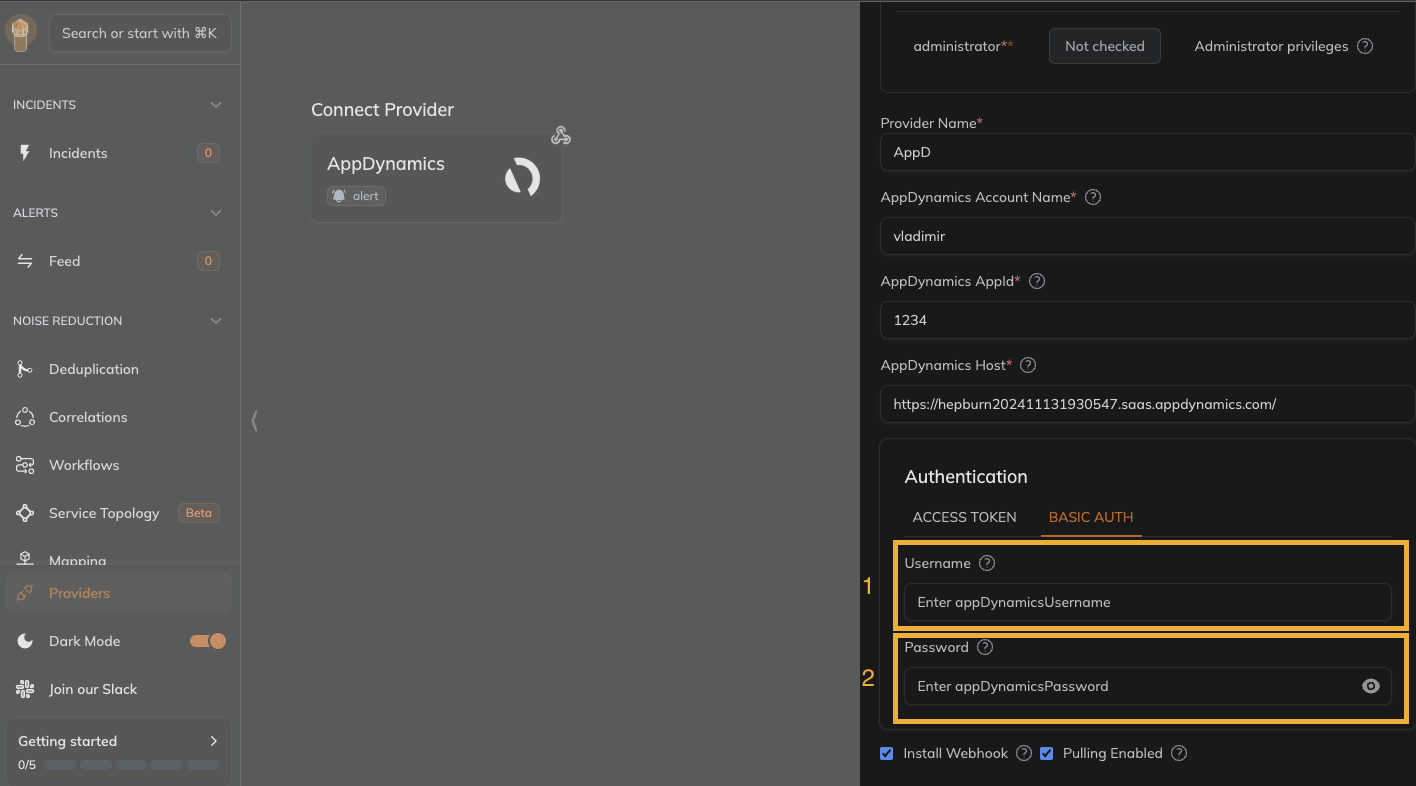
### Basic Auth authentication
1. Obtain AppDynamics **Username** and **Password**
2. Go to **Basic Auth** tab under **Authentication** section
3. Enter **Username** and **Password**
 ### Access Token authentication
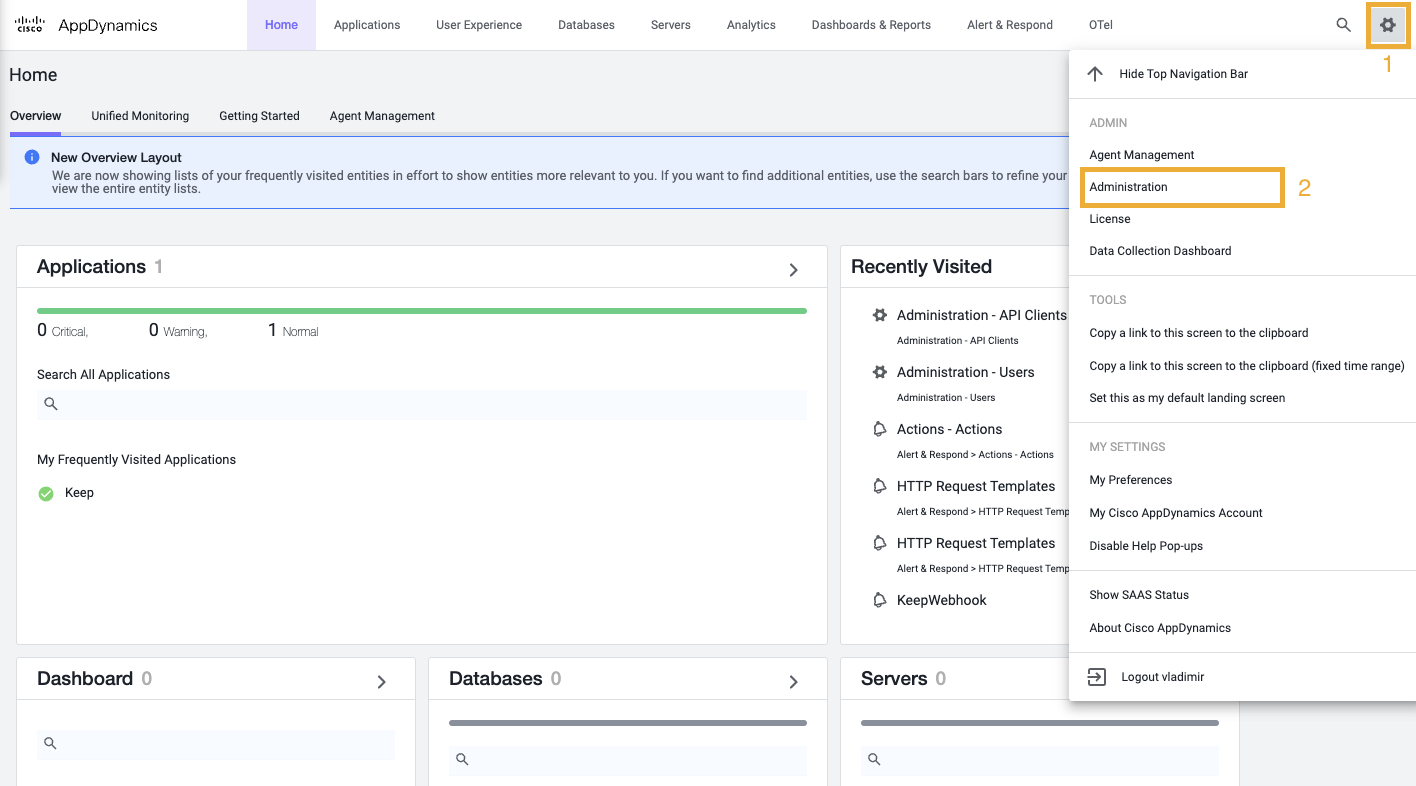
1. Log in to the **Controller UI** as an **Account Owner** or other roles with the **Administer users**, **groups**, **roles** permission.
2. Go to **Administration**
### Access Token authentication
1. Log in to the **Controller UI** as an **Account Owner** or other roles with the **Administer users**, **groups**, **roles** permission.
2. Go to **Administration**
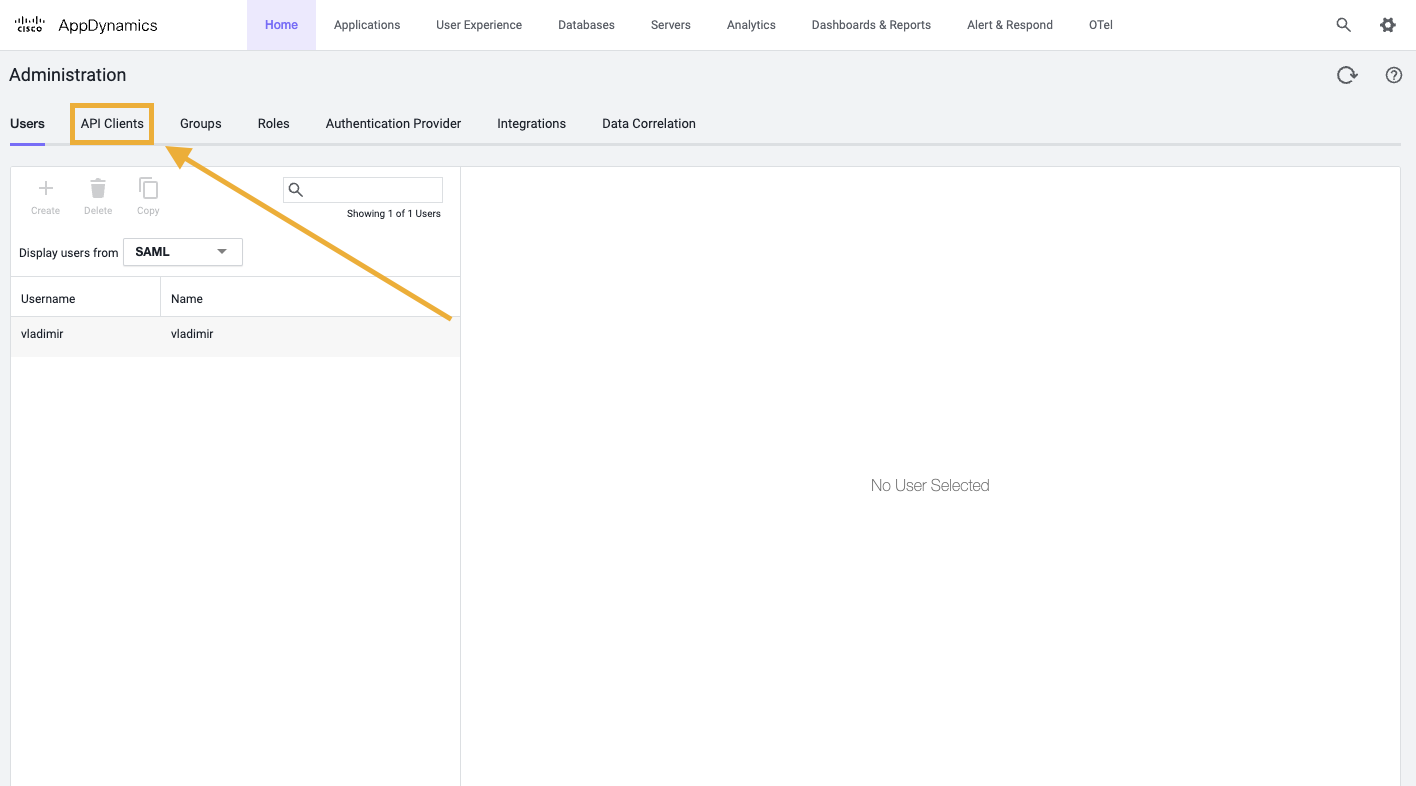
 3. Go to **API Client** tab
 4. Click **+ Create**
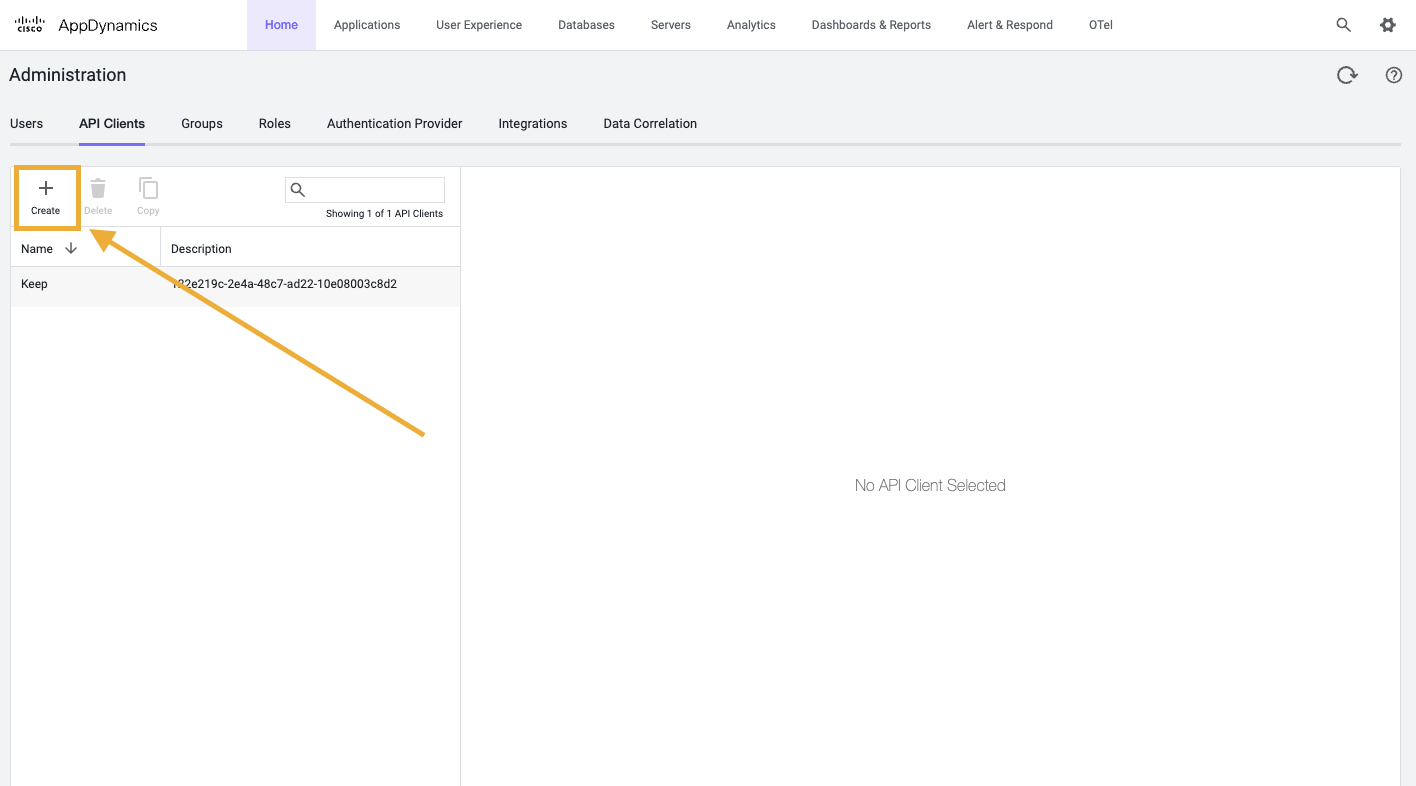 5. Fill Client **Name** and **Description**
6. Click **Generate Secret**
5. Fill Client **Name** and **Description**
6. Click **Generate Secret**
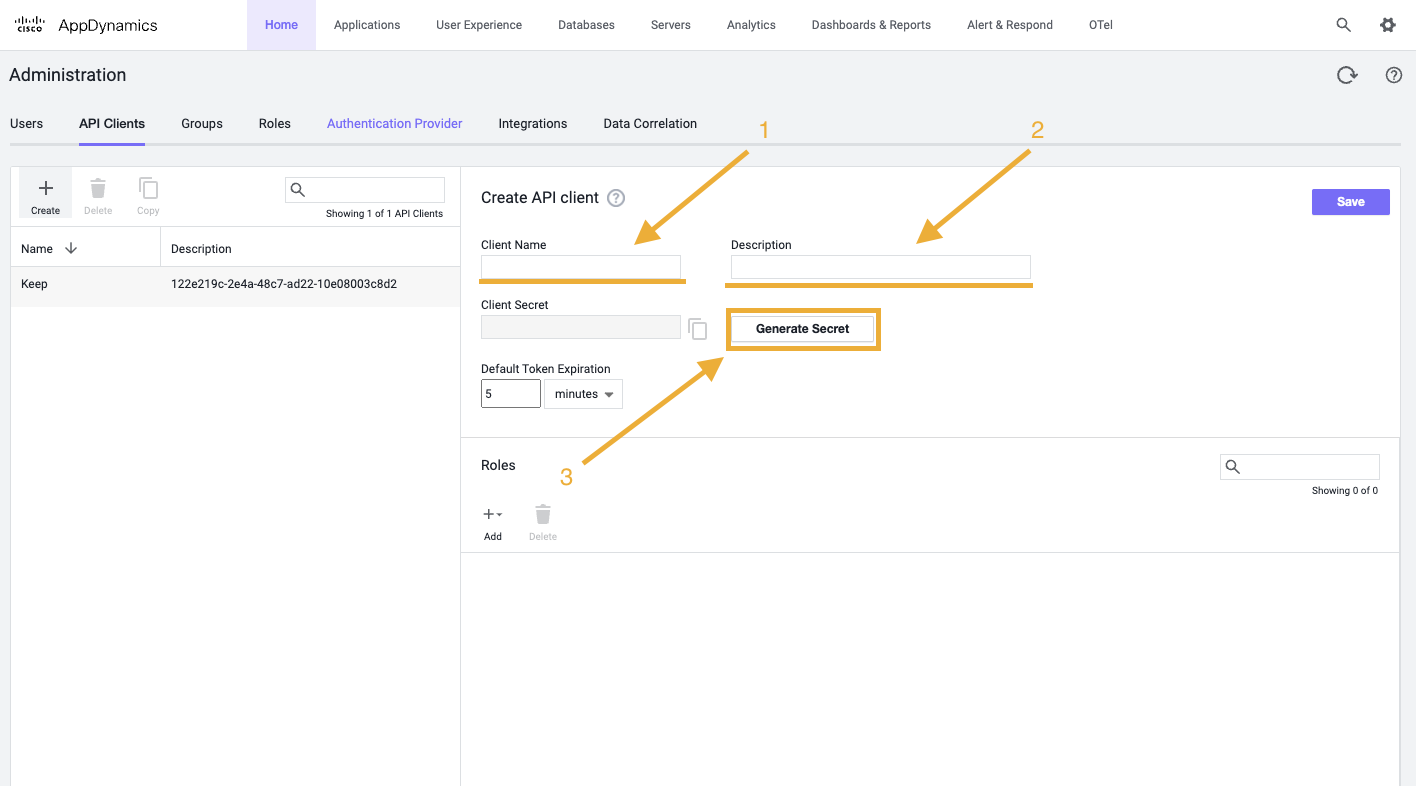 This API Client secret is not an authentication token yet
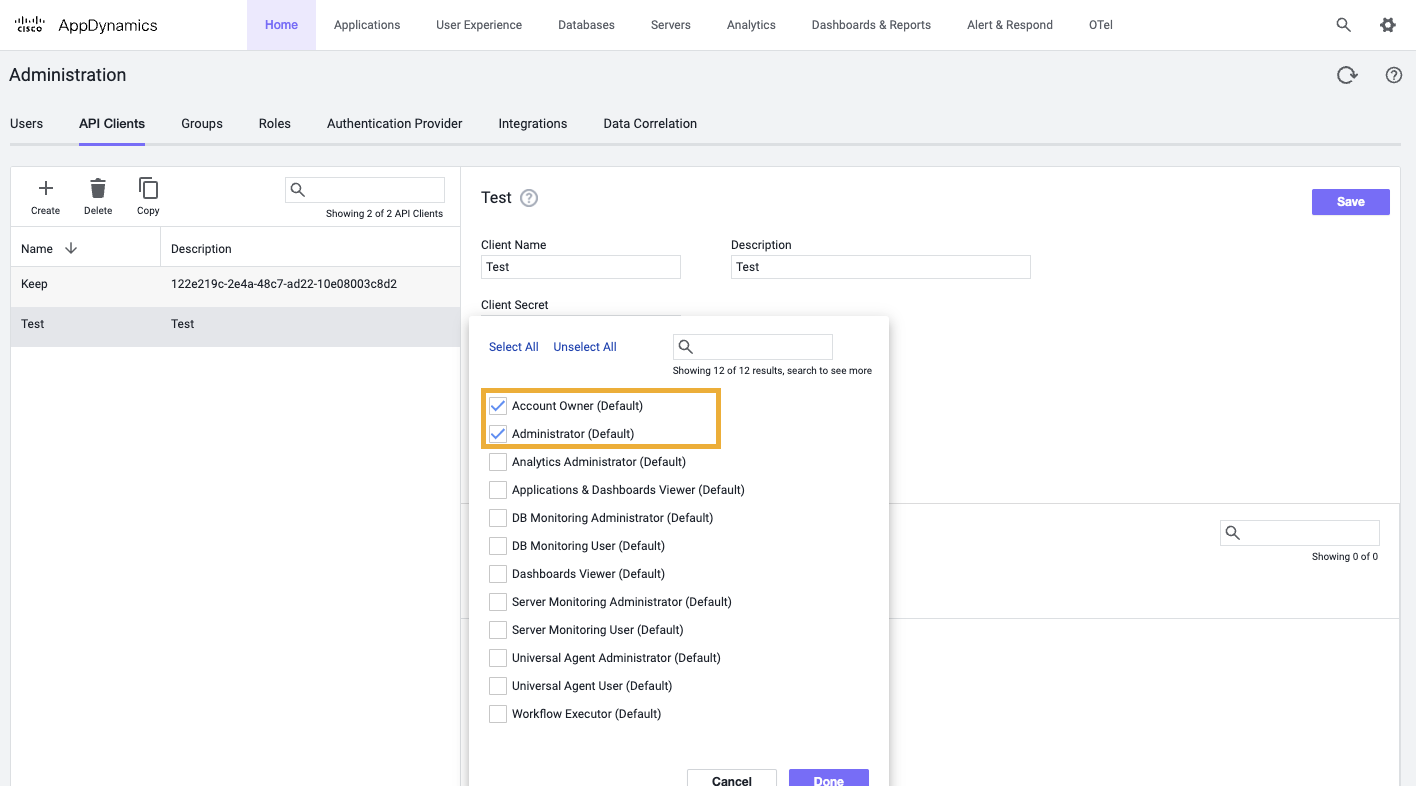
7. Add **Account Owner** and/or **Administrator** roles
This API Client secret is not an authentication token yet
7. Add **Account Owner** and/or **Administrator** roles
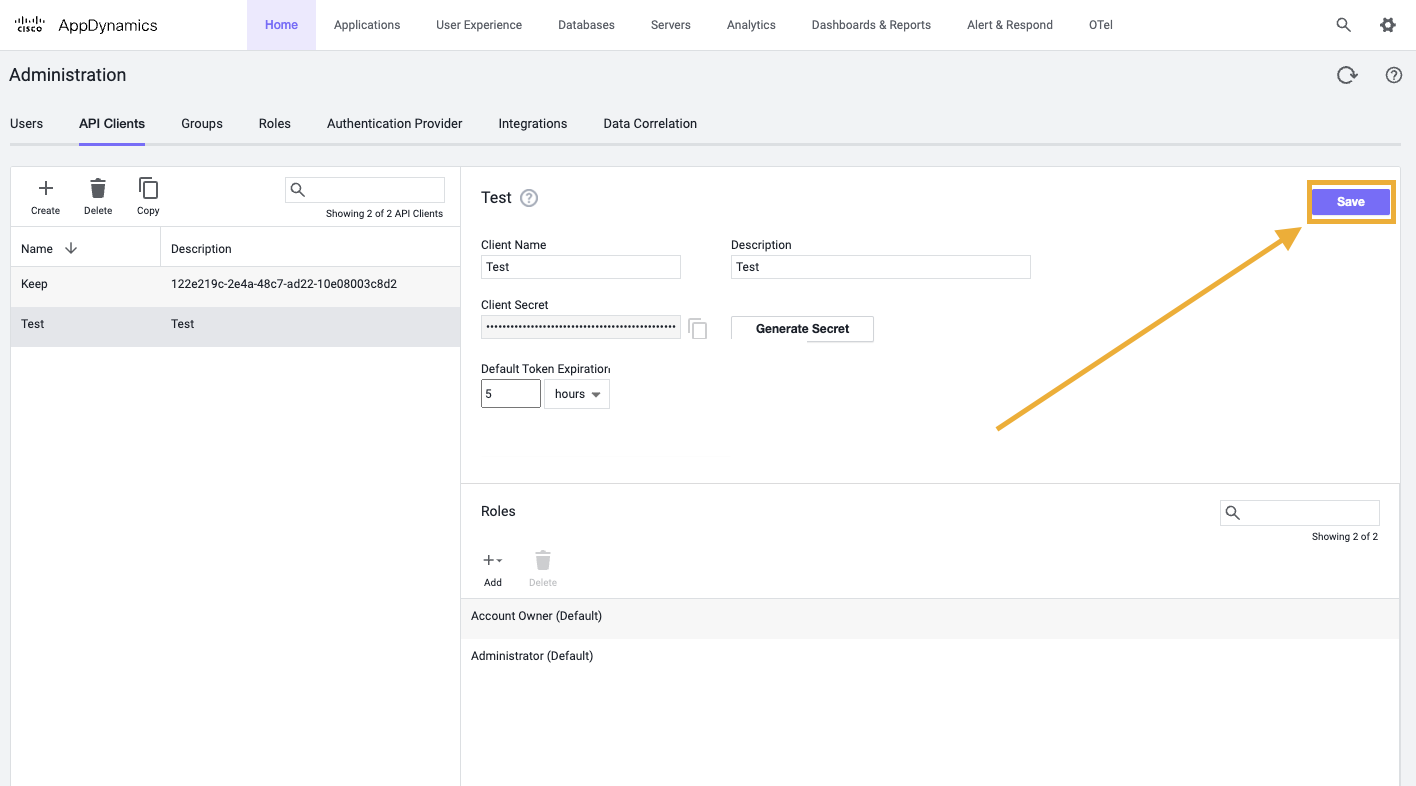
 8. Click **Save**
 9. Click **Generate Temporary Token**
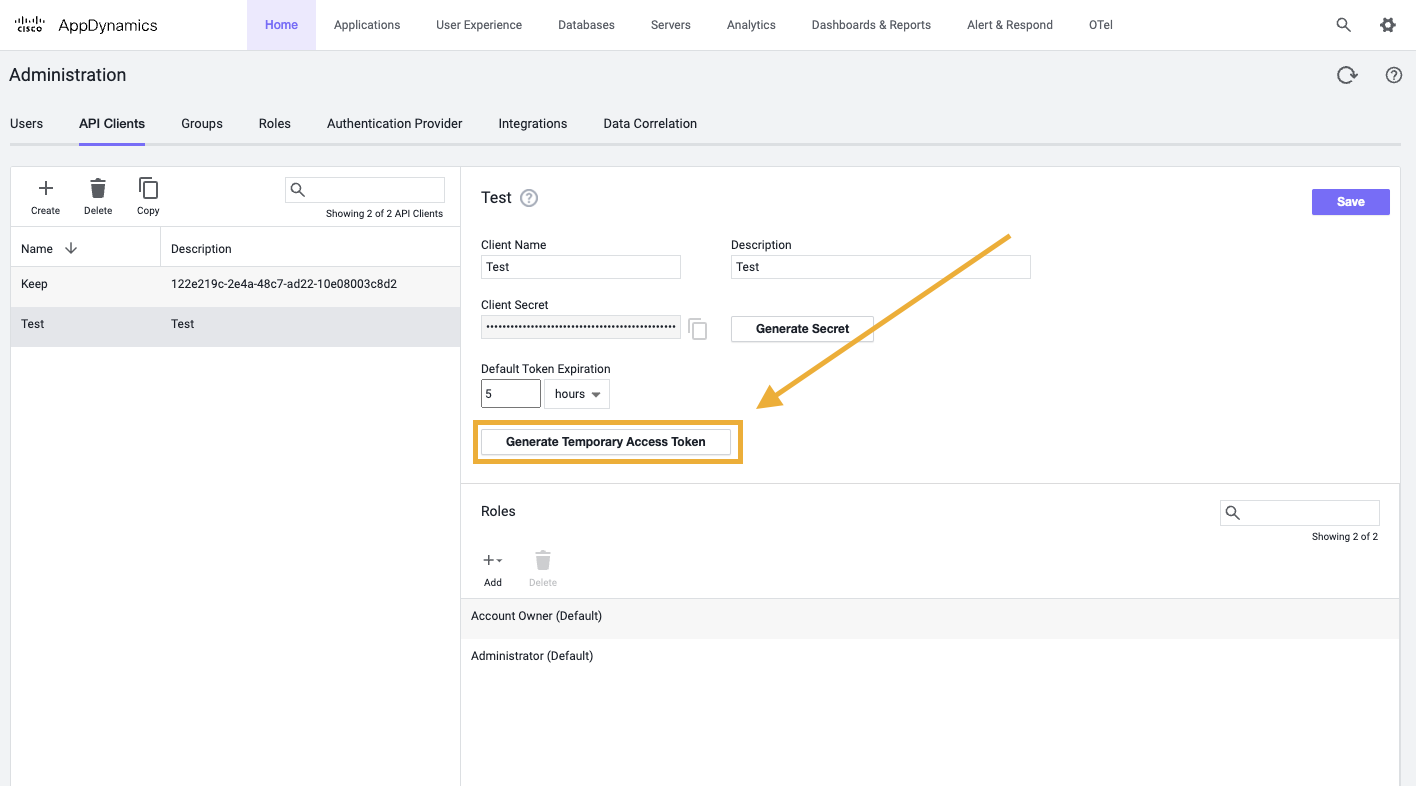 This token is not persistent, but since Keep uses it just once to install Webhook, we will use it without oAuth
10. Click **Save** one again
This is important. Otherwise generated token will not be saved and authentication will fail
11. Copy generated token
This token is not persistent, but since Keep uses it just once to install Webhook, we will use it without oAuth
10. Click **Save** one again
This is important. Otherwise generated token will not be saved and authentication will fail
11. Copy generated token
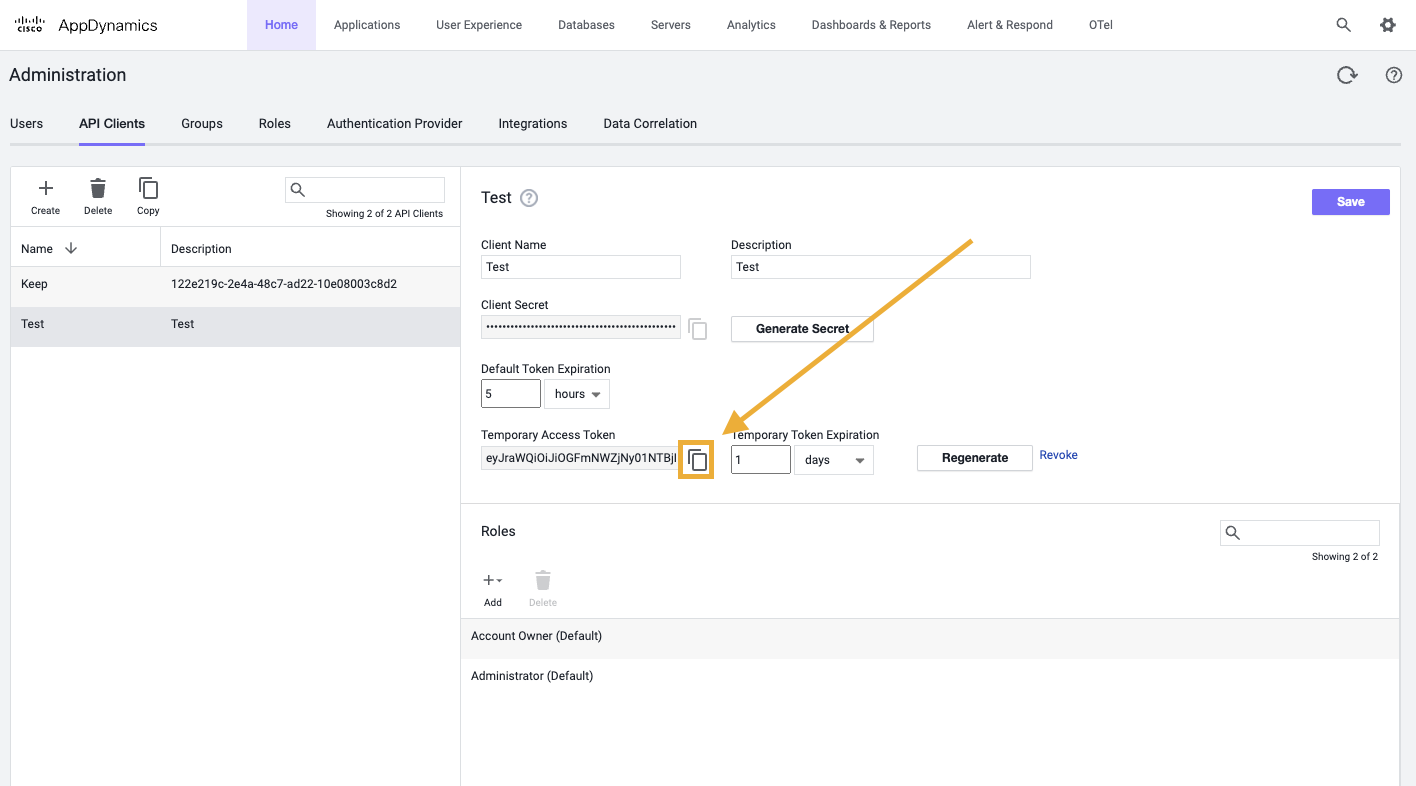 12. Go to **Access Token** tab under **Authentication** section
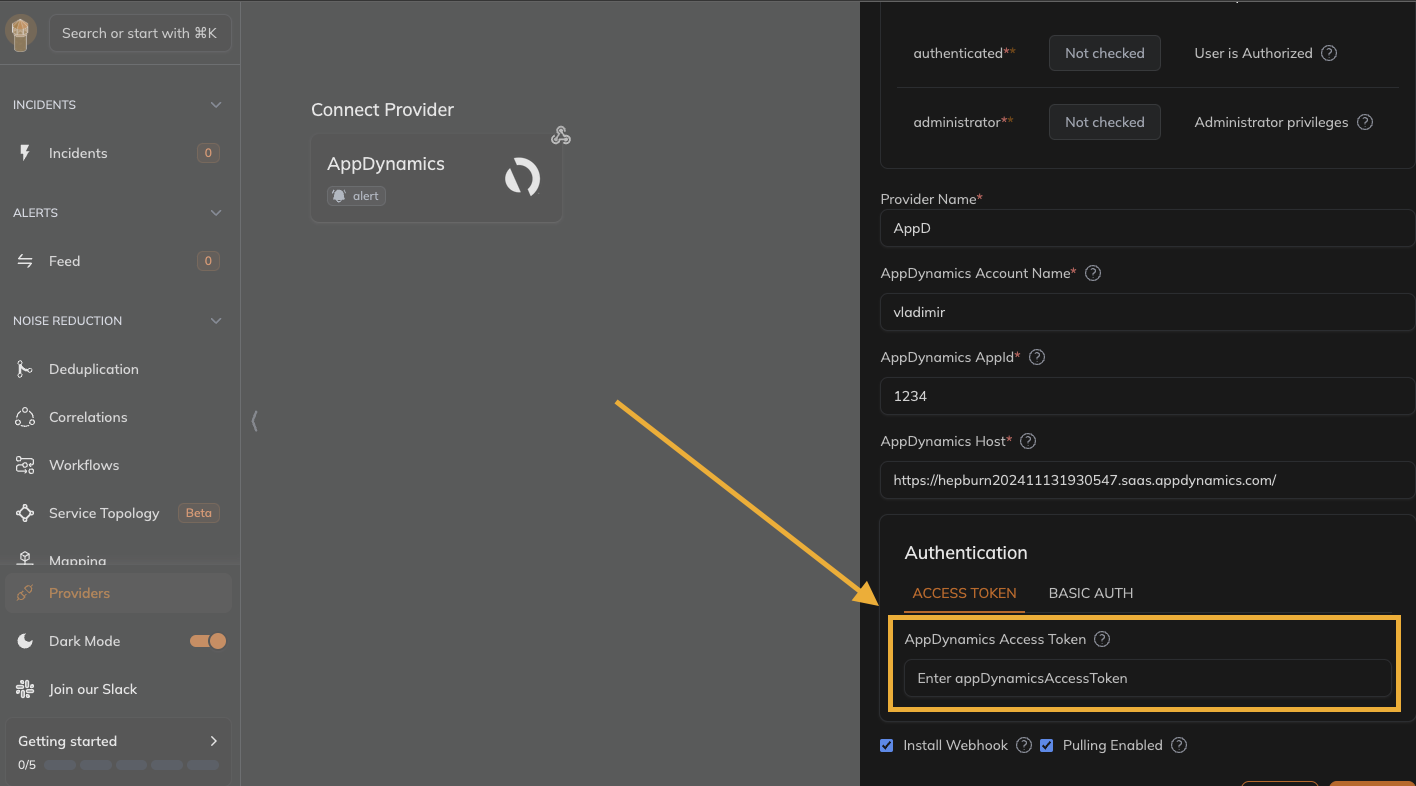 13. Enter Access Token
## Connecting provider
1. Ensure **Install webhook** is checked
2. Click **Connect**
## Webhook Integration Modifications
The webhook integration adds Keep as an alert monitor within the AppDynamics instance. It can be found under the "Alerts & Respond" section.
The integration automatically gains access to the following scopes within AppDynamics:
* `administrator`
* `authenticated`
## Useful Links
* [AppDynamics HTTP Action Templates](https://docs.appdynamics.com/appd/24.x/24.3/en/extend-cisco-appdynamics/cisco-appdynamics-apis/configuration-import-and-export-api#id-.ConfigurationImportandExportAPIv24.2-ImportHTTPActionTemplatesintoanAccount)
* [AppDynamics Permissions and Roles](https://docs.appdynamics.com/accounts/en/cisco-appdynamics-on-premises-user-management/roles-and-permissions)
* [AppDynamics User Accounts](https://docs.appdynamics.com/accounts/en/global-account-administration/access-management/manage-user-accounts)
13. Enter Access Token
## Connecting provider
1. Ensure **Install webhook** is checked
2. Click **Connect**
## Webhook Integration Modifications
The webhook integration adds Keep as an alert monitor within the AppDynamics instance. It can be found under the "Alerts & Respond" section.
The integration automatically gains access to the following scopes within AppDynamics:
* `administrator`
* `authenticated`
## Useful Links
* [AppDynamics HTTP Action Templates](https://docs.appdynamics.com/appd/24.x/24.3/en/extend-cisco-appdynamics/cisco-appdynamics-apis/configuration-import-and-export-api#id-.ConfigurationImportandExportAPIv24.2-ImportHTTPActionTemplatesintoanAccount)
* [AppDynamics Permissions and Roles](https://docs.appdynamics.com/accounts/en/cisco-appdynamics-on-premises-user-management/roles-and-permissions)
* [AppDynamics User Accounts](https://docs.appdynamics.com/accounts/en/global-account-administration/access-management/manage-user-accounts)