> ## Documentation Index
> Fetch the complete documentation index at: https://docs.keephq.dev/llms.txt
> Use this file to discover all available pages before exploring further.
# Zabbix
> Zabbix provider allows you to pull/push alerts from Zabbix
Please note that we currently only support Zabbix of version 6 and above
(6.0^)
## Authentication
This provider requires authentication.
* **zabbix\_frontend\_url**: Zabbix Frontend URL (required: True, sensitive: False)
* **auth\_token**: Zabbix Auth Token (required: True, sensitive: True)
* **verify**: Verify SSL certificates (required: False, sensitive: False)
Certain scopes may be required to perform specific actions or queries via the provider. Below is a summary of relevant scopes and their use cases:
* **action.create**: This method allows to create new actions. (mandatory) ([Documentation](https://www.zabbix.com/documentation/current/en/manual/api/reference/action/create))
* **action.get**: This method allows to retrieve actions. (mandatory) ([Documentation](https://www.zabbix.com/documentation/current/en/manual/api/reference/action/get))
* **event.acknowledge**: This method allows to update events. (mandatory) ([Documentation](https://www.zabbix.com/documentation/current/en/manual/api/reference/event/acknowledge))
* **mediatype.create**: This method allows to create new media types. (mandatory) ([Documentation](https://www.zabbix.com/documentation/current/en/manual/api/reference/mediatype/create))
* **mediatype.get**: This method allows to retrieve media types. (mandatory) ([Documentation](https://www.zabbix.com/documentation/current/en/manual/api/reference/mediatype/get))
* **mediatype.update**: This method allows to update media types. (mandatory) ([Documentation](https://www.zabbix.com/documentation/current/en/manual/api/reference/mediatype/update))
* **problem.get**: The method allows to retrieve problems. (mandatory) ([Documentation](https://www.zabbix.com/documentation/current/en/manual/api/reference/problem/get))
* **script.create**: This method allows to create new scripts. (mandatory) ([Documentation](https://www.zabbix.com/documentation/current/en/manual/api/reference/script/create))
* **script.get**: The method allows to retrieve scripts. (mandatory) ([Documentation](https://www.zabbix.com/documentation/current/en/manual/api/reference/script/get))
* **script.update**: This method allows to update scripts. (mandatory) ([Documentation](https://www.zabbix.com/documentation/current/en/manual/api/reference/script/update))
* **user.get**: This method allows to retrieve users. (mandatory) ([Documentation](https://www.zabbix.com/documentation/current/en/manual/api/reference/user/get))
* **user.update**: This method allows to update users. (mandatory) ([Documentation](https://www.zabbix.com/documentation/current/en/manual/api/reference/user/update))
## In workflows
This provider can't be used as a "step" or "action" in workflows. If you want to use it, please let us know by creating an issue in the [GitHub repository](https://github.com/keephq/keep/issues).
## Provider Methods
The provider exposes the following [Provider Methods](/providers/provider-methods#via-ai-assistant). They are available in the [AI Assistant](/overview/ai-incident-assistant).
* **close\_problem** No description. (action, scopes: event.acknowledge)
* `id`: The problem id.
* **change\_severity** No description. (action, scopes: event.acknowledge)
* `id`: The problem id.
* `new_severity`: The new severity. Can be an integer string (0-5) or severity name:
* "0" or "Not classified"
* "1" or "Information"
* "2" or "Warning"
* "3" or "Average"
* "4" or "High"
* "5" or "Disaster"
* **surrpress\_problem** No description. (action, scopes: event.acknowledge)
* `id`: The problem id.
* `suppress_until`: The datetime to suppress the problem until.
* **unsurrpress\_problem** No description. (action, scopes: event.acknowledge)
* `id`: The problem id.
* **acknowledge\_problem** No description. (action, scopes: event.acknowledge)
* `id`: The problem id.
* **unacknowledge\_problem** No description. (action, scopes: event.acknowledge)
* `id`: The problem id.
* **add\_message\_to\_problem** No description. (action, scopes: event.acknowledge)
* `id`: The problem id.
* `message_text`: The message text.
* **get\_problem\_messages** No description. (view, scopes: problem.get)
* `id`: The problem id.
## Connecting with the Provider
### API Key
To obtain Zabbix authentication token, follow the following steps, divided in to 3 categories ([Docs](https://www.zabbix.com/documentation/current/en/manual/web_interface/frontend_sections/users/api_tokens)):
First, login in to your Zabbix account (the provided `zabbix_frontend_url`) with a privileged user.
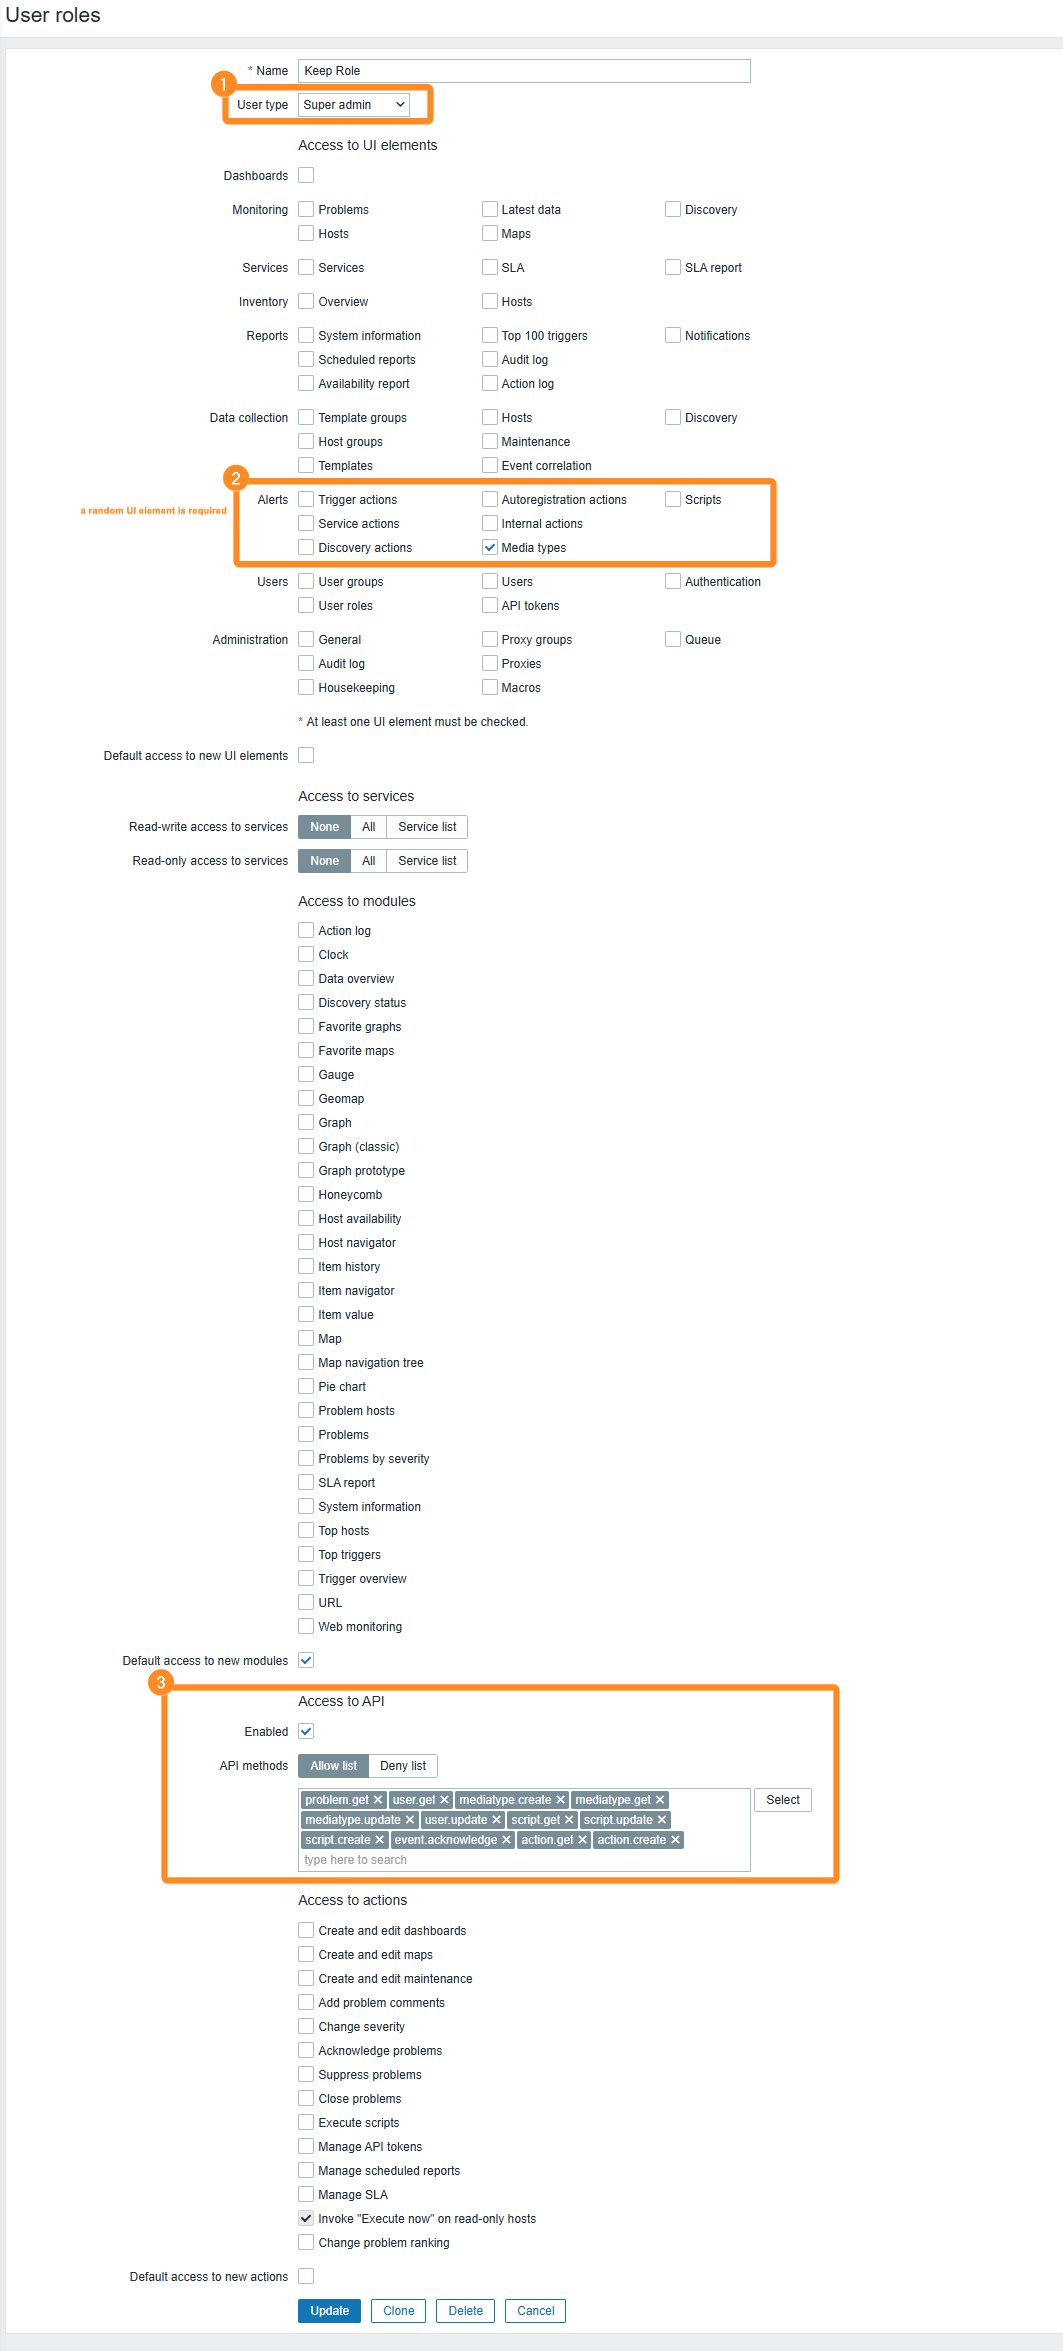
#### Create a User Role
1. Navigate to `Users` -> `User Roles` section.
2. In the top right corner of the screen, click `Create user role`
3. Give the role an indicative name (e.g. Keep Role)
4. In the `User type` selectbox, select `Super Admin`
* This is because some of the scopes we need are available to `Super Admin` user type only. [See here](https://www.zabbix.com/documentation/current/en/manual/api/reference/mediatype/create)
5. Remove all the checkboxes from everything, except 1 random `Access to UI elements` which is required for any role.
6. In the `API methods` section, select `Allow list` and fill with these scopes:
* `action.create`
* `action.get`
* `event.acknowledge`
* `mediatype.create`
* `mediatype.get`
* `mediatype.update`
* `problem.get`
* `script.create`
* `script.get`
* `script.update`
* `user.get`
* `user.update`
 #### Create a user
1. Navigate to `Users` -> `Users` section.
2. Follow the instructions to add a new user. Give it an indicative username (e.g. KeepUser)
3. In the `Permissions` tab, select the Role you have just created.
4. Click `Add`
#### Create API token
1. Navigate to `Users` -> `API tokens` section.
2. In the top right corner of the screen, click `Create API token`
3. Give the API token an indicative name (e.g. Keep Token)
4. Select the user you have just created
5. Unselect the `Set expiration date and time` checkbox and click `Add`
6. Copy the generated API token and keep it for further use in Keep.
## Notes
When installing Zabbix webhook, Keep automatically adds a new media type of
type Keep to your media types.
After the new media type is added, Keep
automatically adds this mediatype as a media to all existing users, in order
to get all alerts incoming from Zabbix.
## Webhook Integration Modifications
The automatic webhook integration grants Keep access to the following scopes within the Zabbix instance:
* `mediatype.get`
* `mediatype.update`
* `mediatype.create`
* `user.get`
* `user.update`
You can view the webhook settings under **Alerts > Media Types**
## Useful Links
* [Zabbix API](https://www.zabbix.com/documentation/current/en/manual/api)
#### Create a user
1. Navigate to `Users` -> `Users` section.
2. Follow the instructions to add a new user. Give it an indicative username (e.g. KeepUser)
3. In the `Permissions` tab, select the Role you have just created.
4. Click `Add`
#### Create API token
1. Navigate to `Users` -> `API tokens` section.
2. In the top right corner of the screen, click `Create API token`
3. Give the API token an indicative name (e.g. Keep Token)
4. Select the user you have just created
5. Unselect the `Set expiration date and time` checkbox and click `Add`
6. Copy the generated API token and keep it for further use in Keep.
## Notes
When installing Zabbix webhook, Keep automatically adds a new media type of
type Keep to your media types.
After the new media type is added, Keep
automatically adds this mediatype as a media to all existing users, in order
to get all alerts incoming from Zabbix.
## Webhook Integration Modifications
The automatic webhook integration grants Keep access to the following scopes within the Zabbix instance:
* `mediatype.get`
* `mediatype.update`
* `mediatype.create`
* `user.get`
* `user.update`
You can view the webhook settings under **Alerts > Media Types**
## Useful Links
* [Zabbix API](https://www.zabbix.com/documentation/current/en/manual/api)